Are you tired of dealing with a full Inbox and the constant distraction of incoming emails? We often spend more time than we need to on our emails while we could be focusing on other important tasks and projects. Many employees use Microsoft Outlook as their desktop email client, but few are reaping the full benefits this powerful program has to offer. Chances are that you may have overlooked many of its time-saving tools and features. Here we’ll guide you on how to take full advantage of Outlook and get that “zero Inbox” feeling you’ve been longing for.
1. Organize emails into folders according to priority
Your current approach of using the default folder structure in Outlook may be slowing you down. Instead, you can create a new structure of folders to organize emails based on urgency and complexity.
To do this, create three new folders under your Inbox folder. Name the folders “To Do”, “Follow Up” and “Someday” in that order.
Right-click your “Inbox” folder, and select “New Folder”

Name the first folder “To Do”

You can access the “To Do” folder by clicking on the arrow next to the “Inbox” folder
Right-click the To-Do folder, select “new folder”, and name this folder “Someday.”

Repeat to create a “Follow Up” subfolder under the To-Do folder.
Now that you have four folders for incoming emails, here’s how you decide which folder to move a new email into:
Inbox – The only emails that stay in your Inbox are those that you should answer immediately. They’re either urgent or can be handled quickly (in three minutes or less).
To-Do – Drag non-urgent emails and emails that will require more than a three-minute response into your To-Do folder. You’ll follow up on these items later but moving them immediately will prevent your inbox from filling up while you are processing the emails in there. Schedule time on your calendar every day to review and handle the items in your To-Do folder.
Follow Up – Move emails to this folder that are put on hold. Things like replies you’re waiting to receive or tasks that you’ve delegated.
Someday – This folder is for emails that don’t require a response. Instead, they’re things you’d like to read/review when you have time. Drag those into the someday folder to revisit at some point in the future when work slows down, and you need something to do.
Using the above method of “email triage” you can avoid dealing with a messy, overloaded Inbox. The stream of incoming emails won’t get mixed with existing emails you’ve already read or push down the important emails. Your emails will also be better organized, by using only four folders, you can easily access and work through emails in order of priority. Finally – and perhaps best of all – this method improves your time management throughout the day, allowing you to focus on other key tasks instead of being interrupted by a constant onslaught of questions and requests via email.
2. Use the Outlook Task List to Set Deadline for Responses
There will be certain, non-urgent emails in your To-Do folder that still need to be handled before the time you have scheduled to review all items in that folder. You can set a reminder for those specific emails to ensure that you respond to them before a deadline. Use Outlook’s task list to create the reminder:
Drag the email and drop it on Outlook’s task list icon.

Add a due date and set a date and time to receive a reminder. Save the task.

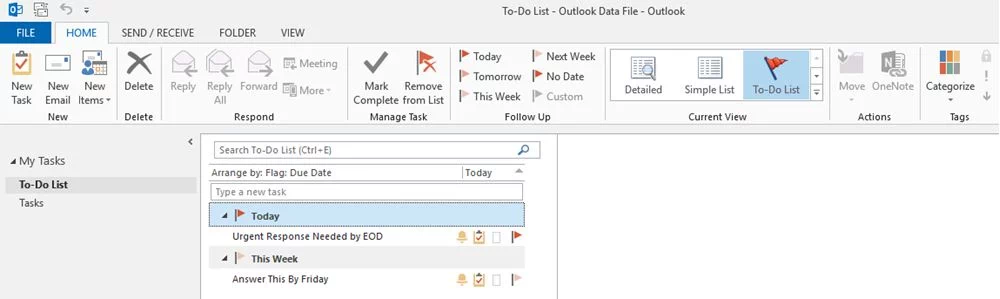
Click on the task list icon to open your To-Do list and review the respective tasks. You can also hover your cursor over the task list icon to see a quick view of your task list, organized by the due date.
The task will pop up like a meeting reminder at the specified date and time.

Once the task is complete, mark it as such to remove the task from your To-Do list. Open the task by double-clicking it and click the “Mark Complete” button—or just press the Insert key to quickly mark the item complete.

Outlook’s task list is also useful as an alternative to copying yourself on emails as a reminder to follow up, or if you’re emailing someone who is prone to ignoring your requests. Instead of keeping reminders as emails in your Inbox, just move them to your To-Do folder and add them to your task list.
3. Clean Up Your Inbox in One Click
Whether you’re coming back from vacation or you just have too many emails piled up. Outlook’s clean-up function (introduced in Outlook 2010) can drastically reduce the number of emails you have to deal with. With just a few clicks, the clean-up function removes all email replies that are duplicated in a later thread, allowing you to read a single thread instead of dozens of individual emails. Below is how to use the clean-up function:
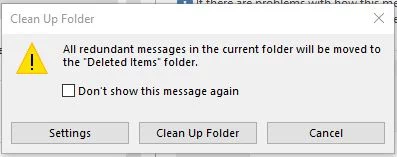
While viewing your Inbox, click the “Clean Up” button, and select “Clean Up Folder.”
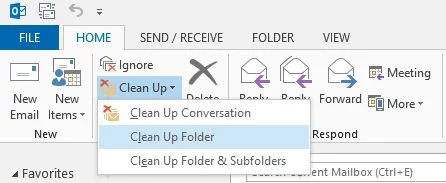
Click the “Clean Up Folder” button in the popup to confirm the action.
Outlook will automatically remove all duplicate messages, leaving you with significantly fewer emails to sort through.

Above you can see that the clean-up tool removed 29 duplicate emails from the Inbox. If needed, those emails can be accessed in the trash folder.
It may feel disconcerting when you initially start using the clean-up function. What if it deletes something important like a reply that contained an attachment that was removed in a later thread? Rest assured: the tool is sophisticated and will not delete any emails with attachments or text that aren’t exactly duplicated in later threads, and you can always review deleted items in the trash folder if needed.
4. Use Rules to Sort and Delete Irrelevant Emails
Every day, there will be irrelevant emails arriving in your Inbox that are purely a distraction. Unfortunately, they often don’t contain an unsubscribe link. Some common examples include:
Automatic Notifications: If you’re assigned to a team on a work collaboration platform, such as customer relationship management (CRM) software, that platform may send an email every time a change is made in the system.
Non-work-related Emails: Sometimes a team leader or department will send daily/weekly emails with trivia, memes, or jokes designed to boost staff morale.
Threads You Shouldn’t Have Been Included On: Occasionally, someone will send a mass email that gets dozens of replies—none of which have anything to do with you or your job.
To prevent these emails from hindering your productivity at work, use Outlook’s rules function to skip the Inbox and send those emails straight to the trash—or to another folder. For example, you can create rules that ensure emails from your boss with a certain subject line are always sent to the To-Do folder and emails from a newsletter you regularly read are sent to the Someday folder. Follow the step below to create a new rule:
Right-click the email, hover over “Rules,” and select “Create Rule.”

Choose the criteria for the rule:
“From [Sender]” will execute the rule any time you receive an email from a specific email address or contact.
“Subject contains” will execute the rule any time a specified subject line is used.
Select what happens when the rule runs:
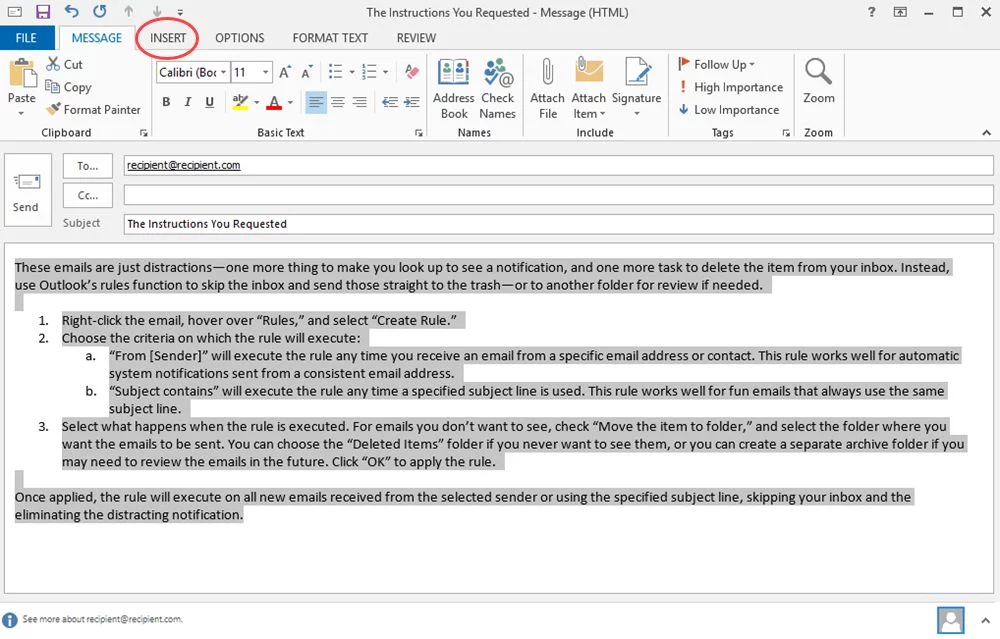
To sort emails out of your Inbox and into the appropriate folder, check “Move the item to folder,” and select the folder where you want the emails to be sent.
You can choose the “Deleted Items” folder if you never want to see them, or you can create a separate archive folder if you may need to review the emails in the future.

Click “OK” to apply the rule.
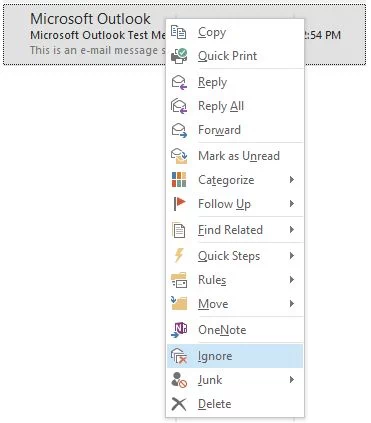
If you want to prevent getting future emails on a specific thread, instead of creating a rule, you can just use Outlook’s ignore function. Ignore automatically sends future replies to that thread to your “Deleted Items” folder so you don’t receive them in your Inbox.
Right-click the email, select “Ignore,” and confirm the action.
5. Create Response Templates to Common Questions
A large amount of time is wasted on handling frequently asked questions via email. You find yourself typing the same answer repeatedly or having to find an old response to copy and paste. Work smarter by using Quick Parts to insert that text into email replies in just a few clicks. When you’ve finished typing a response that you expect to send again, follow the steps below to save the text as a Quick Part:
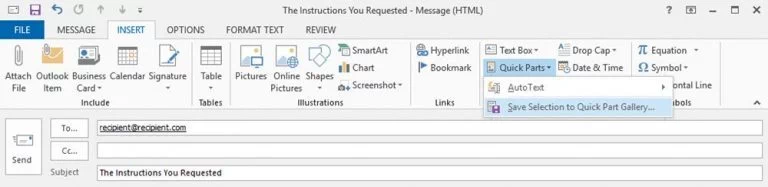
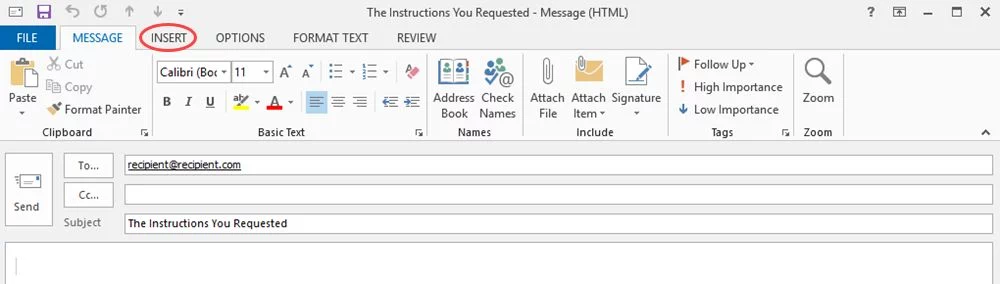
Highlight the text you want to save in the email, and click the “Insert” tab.
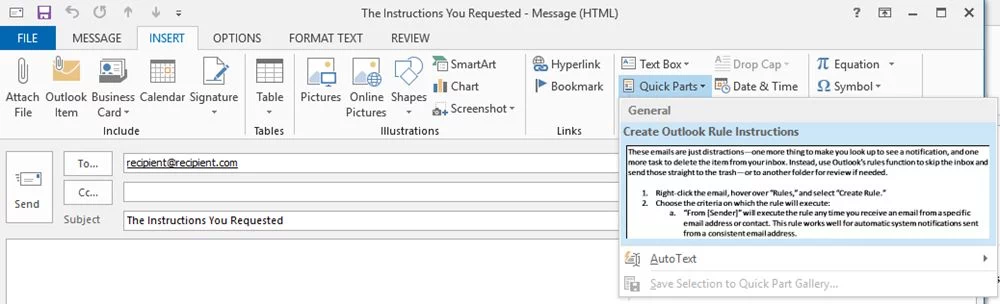
Within the “Insert” menu, click “Quick Parts,” and select “Save Selection to Quick Part Gallery.”
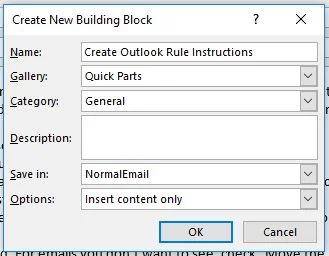
Give your new Quick Part a descriptive name and click “OK.”
With this Quick Part saved, you can now add that text to any email with just a few clicks.
To add the text, place your cursor in the body section of the email, click the “Insert” tab.
Click “Quick Parts,” and then select the Quick Part you want to insert.
The prewritten text will automatically appear in the body of your email, and you can edit and customize it as needed for your new response.
6. Use Quick Steps to Take Automatic Actions
If you’ve mastered the previous Outlook tips and are interested in learning more advanced email management, it’s time to look at Quick Steps. Quick Steps allows you to automatically perform a more complex series of actions based on a trigger.
Imagine this common scenario: at the end of the month you receive a series of invoices from vendors or contractors. Your normal process is to review the invoices, forward the invoices to your accountant, and create a reminder to follow up with the accountant a week later to make sure the invoices were paid.
Quick Steps helps you complete the last two steps in less time compared to you performing the tasks manually:
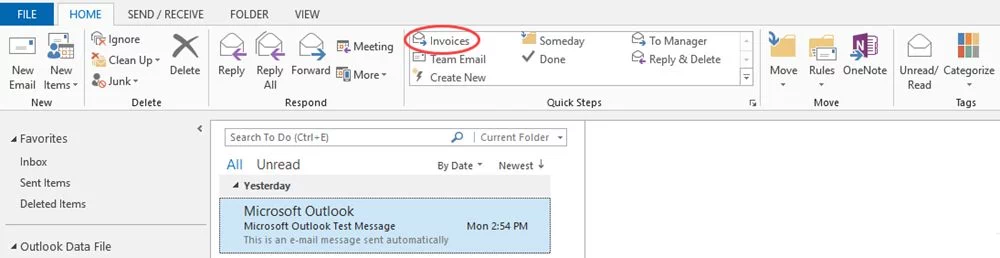
Click the “Create New” button in the Quick Steps section of the Home ribbon.

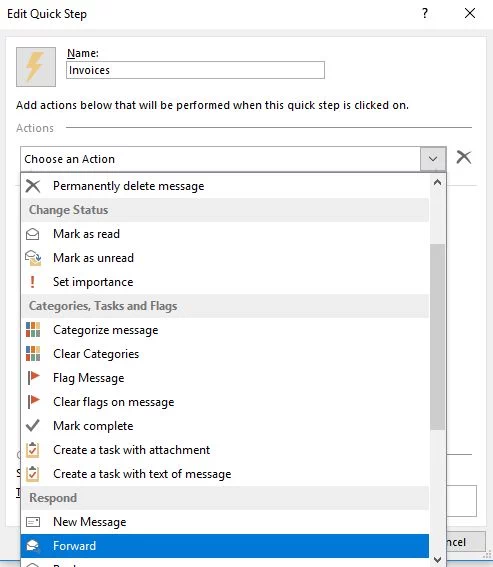
Give the new Quick Step a descriptive name and select the first action: “Forward.”
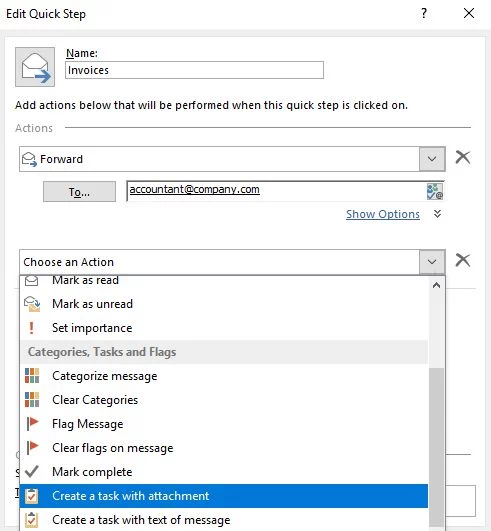
Type your accountant’s email address into the “To” field.

Click the “Add Action” button to select the second action: “Create a task with attachment.”
Click “Finish” to create the Quick-Step.
After you review an invoice, you can now execute the Quick-Step to forward the email and create a reminder task. Select an email containing an invoice and click the appropriate Quick-Step in the Home ribbon.
The email forward and task windows will open automatically. Click “Send” to forward the email and set a due date and reminder for the task before saving, if required.
There are many ways to use Quick Steps to speed up email processing. Spend some time thinking about the repetitive actions you take on emails and set up Quick Steps to streamline your email management, so it becomes an effortless process.
3 Simple Microsoft Outlook Features That Make Life Easier
According to research, the average person spends 28 percent of their work week on email, that’s more than 11 hours per week. Most of us use Microsoft Outlook as our work email client, but how many of us are using all its time-saving features? With so much of our productivity being dependent on how we manage our emails, here are a few Outlook hacks you should know about:
Connect Zoom to your Outlook account
As more people are now working remotely, video conferencing has become an essential tool of communication. You have most likely heard of or are using Zoom, a popular video-conferencing program. Using video, phone and text messaging, Zoom users can conduct virtual meetings and webinars from multiple locations and time-zones. If you use Outlook to organise Zoom meetings on a frequent basis, you can save time and make your life easier by integrating the two programs. It only takes a few simple steps:
- Download the Zoom add-on from the Microsoft app store. This is available for free, you simply need to click on the “Get it now” button to start the automatic download.
- Once the Zoom add-on has been downloaded, a pop-up will appear, enter your Outlook account information and then click “Sign in”.
- The terms and conditions will appear, click “Continue”.
- Your Outlook email client will open in your internet browser. Click “Install”.
- Then you’ll see instructions explaining how to use the add-on. Click “OK”.
You’ve now successfully installed the Zoom add-on for your Outlook account. Now you can use it to simplify how you schedule meetings in Outlook.
Export contacts from Outlook
No matter what device or program you’re using, it’s always wise to back up your data. This is especially important when it comes to your Outlook contacts list. Imagine losing all those contact details that are such a key part of your business. Fortunately, it only takes a few clicks to create a backup file for your contact data in Outlook:
- Open Outlook and click the “File” tab at the top-left of the screen, then click “Open & Export” near the top of the left menu on the next screen.
- Click “Import/Export” on the next screen, then select “Export to a file” in the popup window.
- On the next window, select “Export to a file”, then click “Next.”
- Select “Comma Separated Values” (CSV).
- If you have multiple Outlook-linked accounts, choose the account you want to export contacts for. Select “Contacts” under and then click “Next”.
- Name the file you’ll create to backup contacts and choose the location you want to save it to, which should usually be the desktop, then click “OK.”
- Click “Finish” then “OK”.
Outlook will save your contacts as a .csv file. This file can be opened in several different programs including Excel, Sharepoint, Google Sheets, and more.
Schedule an email in Outlook
Although you’d usually want to send an email as quickly as possible, there are times when you’d want it to be delivered at a specific time. For example, you may be writing a work-related email in the evening and want to appear in your recipient’s inbox the next morning. Here’s how to use the “Delay Delivery” feature to set a specific time for an email to be sent in Outlook:
For PC users
- Open Outlook and create a new email message as you normally would – but don’t send it.
- At the top of the email message window, click “Options” to switch to the Options ribbon.
- In the Options ribbon, click “Delay Delivery.”
- Make sure there’s a ticked checkbox next to “Do not deliver before” and specify the date and time that you want the email to be sent. When you’re done, click “Close.”
- Click “Send” to send the email message as you usually would.
For Mac users
- Open Outlook and write an email as you usually would, but don’t send it.
- Next to the send icon in the top-left, there will be a small arrow pointing downwards. Click it, and then select “Send Later.”
- Enter the time and date that you want the email to be sent at.
- Click the send icon. Your message will stay in your Drafts folder until the specified date and time hit, at which point it will be sent.
Your Outlook email will then stay in your Outbox and not be sent until the specified send time. As a powerful business email platform, Outlook is designed to help you work smarter. You can learn how to make the most of powerful features from Microsoft programs in future blog articles.
The tips outlined above are just the beginning of the numerous ways you can use Outlook Desktop Client to simplify your email management. Remember, our certified support team is always available to support you with any technical issues relating to email management and other areas of IT. Contact us to find out more about what we can do for you.
Note: Above are tips and tricks for the Outlook Desktop Client specifically and not the Outlook Web App.